On the preview of post page, go back to the Dashboard Page by clicking Briltech > Dashboard.

If the comment section does not appear on a post page, follow the instructions below:
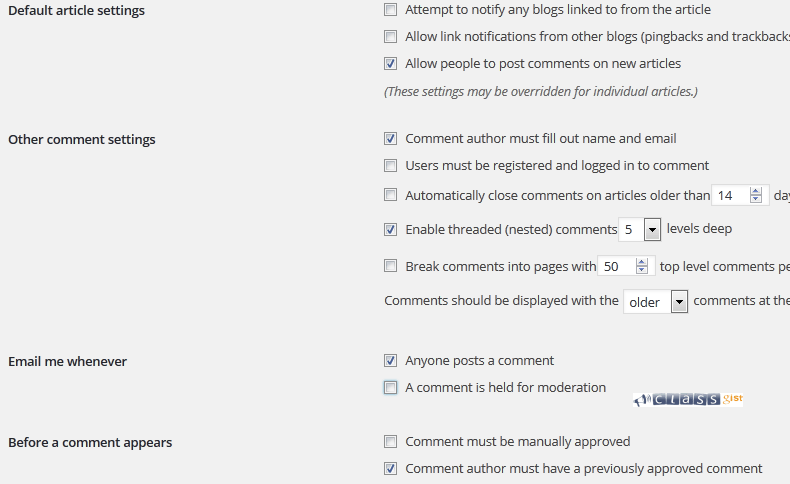
1. Go to Dashboard > Settings > Discussion, it will take you to the "Discussion Settings" page.
In the "Default article settings" section, check the "Allow people to post comments on new articles" checkbox, in the "Other comment settings" section, check the "Comment author must fill out name and e-mail" checkbox, uncheck the "Users must be registered and logged in to comment" checkbox, and uncheck the "Automatically close comments on articles older than" checkbox, in the "E-mail me whenever" section, check the "Anyone posts a comment" check box, scroll down to "Before a comment appears" section, check the "Comment must be manually approved' checkbox(when you want to approve a comment, go to Dashboard > Comments and approve the comment, uncheck the "Comment author must have a previously approved comment" checkbox.

Scroll down to the bottom and click "Save changes".
2. Now go to a blog post page and refresh it, you will see the comment section, if you don't see the comment section go to Dashboard > Posts > All Posts, check the "Title" checkbox, click the bulk action drop down and select Edit, click the "Apply" button, change comment to Allow, click "Update".
3. Refresh a blog post page, you should see the comment section.
What Is Next?
Step by Step
This tutorial is part of a series that walks you through creating your first website or blog using WordPress.
Next Step - 18. Customize the right side bar(widget) of the blog post details page
Previous Step - 16. Create Blog Posts
Start from the beginning - Create your first website or blog using WordPress