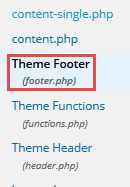
Go to Dashboard > Appearance > Editor, it will take you to the "Edit Themes" page. Go to the right and click on the "Theme Footer(footer.php)" link.

it will take you to the "Sydney: Footer(footer.php)" page.
Click on the proceed button, highlight all the code and delete the codes, copy and paste the code below: (Note: Be VERY careful not to break any code else all your work might be deleted).
<?php
/**
* The template for displaying the footer.
*
* Contains the closing of the #content div and all content after
*
* @package Sydney
*/
?>
</div>
</div>
</div><!-- #content -->
<?php if ( is_active_sidebar( 'footer-1' ) ) : ?>
<?php get_sidebar('footer'); ?>
<?php endif; ?>
<a class="go-top"><i class="fa fa-angle-up"></i></a>
<footer id="colophon" class="site-footer" role="contentinfo">
<div class="site-info container">
<a href="<?php echo esc_url( __( 'http://www.yourdomainname.com', 'sydney' ) ); ?>"><?php printf( __( 'Proudly created by %s', 'sydney' ), 'Your Domain Name' ); ?></a>
</div><!-- .site-info -->
</footer><!-- #colophon -->
</div><!-- #page -->
<?php wp_footer(); ?>
</body>
</html>
Click the "Update File" button. Visit the homepage to see the changes made.
Add custom CSS
Let's add custom CSS to make the website look cool. The custom CSS will make the footer centered, remove the Latest More News button on the home page, remove blog post page timer and also make the right side bar spacing fixed.
Go to Dashboard > Appearance > Custom CSS, it will take you to the "Theme Junkie Custom CSS" page, copy and paste the code below:
.widget_sydney_latest_news .roll-button {
display: none;
}
body > .preloader{ display: none; }
.widget-area .widget {
padding-top: 0;
}
.site-info {
text-align: center;
}
#gallery-1 {text-align: center;}
figure.gallery-item {margin: 5px; width: 267px; display: inline-block;}
Click the "Save" button.
Visit the homepage to see the changes made.
Modify Permalinks
The next thing we are going to do is modify our website links so it shows the www at the beginning of the URL and also how the blog post links look.
Go to Dashboard > Settings > General, it will take you to the "General Settings" page, change the Tagline text box, Wordpress address and site address.
Click the "Save changes" button. if you are asked to login, put in your username and password.
Go to Dashboard > Settings > Permalinks, it will take you to the "Permalink Settings" page, check the "Post name" radio button, click the "Save changes" button.
Congratulations you have successfully built a professional website. Visit the homepage to see what the final product looks like.
What Is Next?
Step by Step
This tutorial is part of a series that walks you through creating your first website or blog using WordPress.
Next Step - 21. Secure your WordPress website
Previous Step - 19. Adding menu to wordpress website
Start from the beginning - Create your first website or blog using WordPress